AUS vs SA 4th ODI 2023: South Africa staged a remarkable comeback in this ODI series against Australia, securing a dominant win in the fourth game. After trailing 2-1 in the series, South Africa bounced back with a commanding performance to level the series at 2-2.
A breathtaking innings by Heinrich Klaasen, who scored an astonishing 174 runs off just 83 balls, laid the foundation for South Africa’s massive total of 418/5, which is the highest ever on this ground in this format. David Miller’s explosive partnership with Klaasen, contributing 82 off 45 balls, propelled South Africa to this colossal total, making a remarkable comeback in the series.
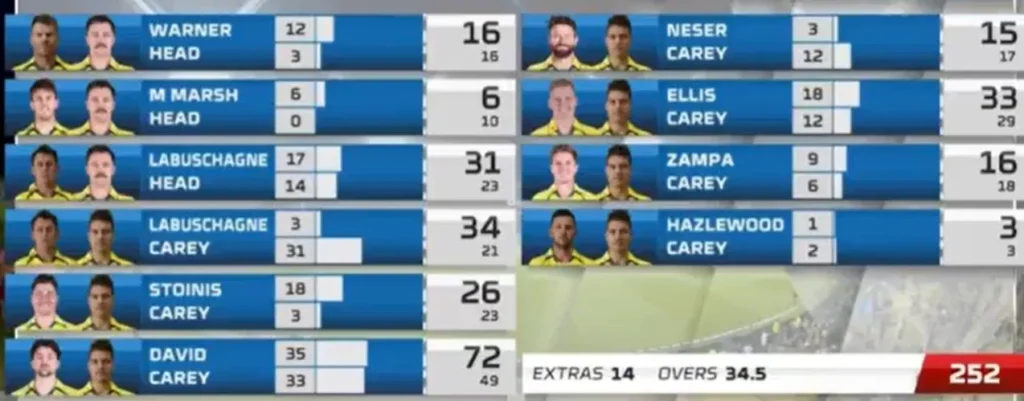
Australia, who had been in formidable form earlier in the series, struggled to chase down the target, with only Alex Carey showing resilience with a brilliant knock. Despite their top-order batsmen getting starts, they couldn’t convert them into big scores, and the lower-middle order couldn’t contribute significantly. South Africa’s bowlers, led by Lungi Ngidi and Kagiso Rabada, capitalized on the pressure created by the massive total, sealing a famous win for the hosts.
With the series now level at 2-2, the fifth and final ODI promises to be a thrilling decider, with both teams still in contention for the series title. South Africa’s comeback sets the stage for an exciting conclusion to this closely contested series, making the final ODI a must-watch event for cricket fans.
Additionally, South Africa’s team total of 418/5 set a new record for the highest score ever at the SuperSport Park in Centurion, leaving a lasting imprint on the ground’s history.
AUS vs SA 4th ODI 2023 Highlights & Scorecards

By the time South Africa’s innings concluded at a commanding 416/5, they had firmly established themselves in a position of dominance. Australia now faced an uphill battle in their chase, with Klaasen’s century and the explosive partnership with Miller leaving an indelible mark on the match’s narrative.
Reeza Hendricks & Quinton de Kock’s Solid Start

The foundation of South Africa’s incredible innings was laid by the opening pair of Reeza Hendricks and Quinton de Kock. Hendricks, the steady hand, anchored the innings with his 28 runs from 34 balls, punctuated by five boundaries. His partnership of 58 runs with the aggressive de Kock set the tone for what was to come. De Kock, on the other hand, provided the early impetus with 45 runs off 64 balls, displaying his ability to find the boundaries when needed. His dismissal proved pivotal, but his aggressive approach injected energy into the innings.
Rassie van der Dussen’s Sensible Contribution
After the departure of de Kock, Rassie van der Dussen assumed the role of the anchor. His unbeaten 35 runs from 42 balls might not have grabbed the headlines, but it was his composure and sensible approach that held the innings together after a couple of quick wickets. Van der Dussen’s innings also featured a stylish boundary and a towering six, showcasing his ability to shift gears when required. His partnership with Aiden Markram helped stabilize South Africa’s innings.
Heinrich Klaasen’s Heroics Ignite South African Onslaught
In a high-octane cricket clash that will be etched in the annals of cricketing history, South Africa’s Heinrich Klaasen emerged as the undisputed hero. His explosive century, a breathtaking spectacle of power-hitting and precision, set the cricketing world on fire. Klaasen’s innings of 174 runs from just 83 balls, adorned with a staggering 16 boundaries including 10 colossal sixes, defied gravity and belief. The electrifying atmosphere in the stadium mirrored the sheer audacity of his stroke play. From an elegant century to an innings of epic proportions, Klaasen redefined the art of controlled aggression, leaving an indelible mark on this clash.
Klaasen-Miller Duo: A Symphony of Destruction
If there was one partnership that defined South Africa’s innings, it was the explosive union of Heinrich Klaasen and David Miller. Their 200-run stand will be etched in cricketing history as one of the most dominant displays of batting prowess. Klaasen, fresh from his century heroics, continued his onslaught, reaching a remarkable 174 runs from just 83 deliveries.
His innings included a staggering 16 boundaries, including six fours and an impressive ten sixes. Miller, on the other hand, played a pivotal role in the partnership, achieving a fantastic fifty. His 82 not out from 45 balls showcased his wide range of shots. Together, they pushed Australia to the brink and set a target that seemed insurmountable.
Australian Bowling Highlights

The Australian bowling effort against South Africa was mixed, with some bowlers making crucial breakthroughs and maintaining control, while others struggled with high economy rates. Josh Hazlewood and Michael Neser stood out by taking key wickets and bowling economically, but Adam Zampa’s expensive spell without wickets and inconsistent performances from Nathan Ellis and Marcus Stoinis hindered their efforts. Collectively, they conceded a formidable total of 419 runs, reflecting a need for improvement in their overall bowling performance to compete effectively.
Nathan Ellis – “Ellis’ Fiery Spell Ignites South African Trouble!”
Bowling Figures: 10.0 overs, 0 maidens, 79 runs conceded, 1 wicket, Economy rate of 7.90
Performance: Nathan Ellis had a decent outing, picking up the crucial wicket of Reeza Hendricks and maintaining an economy rate of 7.90. He played a significant role in breaking the opening partnership, which was crucial in controlling South Africa’s innings.
Josh Hazlewood – “Hazlewood’s Double Strike Sizzles South African Top Order!”
Bowling Figures: 10.0 overs, 0 maidens, 79 runs conceded, 2 wickets, Economy rate of 7.90
Performance: Hazlewood provided important breakthroughs by dismissing Quinton de Kock and later Rassie van der Dussen. His economy rate of 7.90 suggests that he was relatively economical, although he went for a few runs. His wickets were crucial in keeping South Africa’s score in check.
Marcus Stoinis – “Stoinis’ Controlled Fire: Burns Bright with a Crucial Wicket!”
Bowling Figures: 10.0 overs, 1 maiden, 81 runs conceded, 1 wicket, Economy rate of 8.10
Performance: Stoinis bowled a disciplined spell, including a maiden over. While he managed to pick up a wicket, he was slightly expensive with an economy rate of 8.10. However, his control played a role in creating pressure on the batsmen.
Michael Neser – “Neser’s Precision Bowling: Unleashes Chaos in South African Ranks!”
Bowling Figures: 10.0 overs, 0 maidens, 59 runs conceded, 1 wicket, Economy rate of 5.90
Performance: Michael Neser was the most economical among the Australian bowlers, with an economy rate of 5.90. He also contributed with a wicket, dismissing Aiden Markram. His tidy spell helped Australia maintain control during the middle overs.
Adam Zampa – “Zampa’s Spicy Spin, but South African Batsmen Savor the Heat!”
Bowling Figures: 10.0 overs, 0 maidens, 113 runs conceded, 0 wickets, Economy rate of 11.30
Performance: Adam Zampa was the most expensive bowler in the Australian lineup, conceding 113 runs without taking any wickets. Despite his expensive spell, he managed to create some pressure on the batsmen. However, his inability to pick up wickets was a drawback.
Overall, Australia’s bowling unit had a mixed performance. While they managed to pick up wickets at key moments, the economy rates of some bowlers, especially Zampa, were on the higher side. South Africa’s final score of 416/5 indicated that it was a challenging day for the Australian bowlers, but they did reasonably well to keep the opposition from scoring even more.
David Warner’s Disappointing Departure
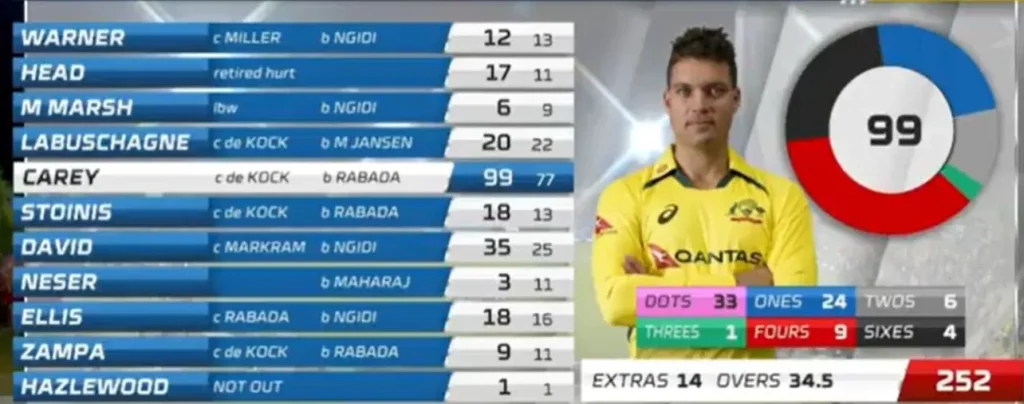
David Warner started the innings with a bang but couldn’t sustain it, scoring 12 runs from 13 balls before falling victim to Lungi Ngidi’s delivery. He was caught at covers by David Miller, marking the early loss of Australia’s first wicket. Warner’s departure set the tone for a challenging chase.
Travis Head’s Explosive Start and Untimely Retirement

Travis Head showed his explosive batting prowess, contributing 17 runs off just 11 balls, including one boundary and one six. Travis Head came out with a bang, hitting a six off Marco Jansen’s bowling, scoring 6 runs from 4 balls. However, his promising start was cut short as he suffered a wrist and palm injury in the 8th over, retiring hurt. His aggressive intent added some early fireworks to Australia’s innings.
Mitchell Marsh’s Lbw Drama
Mitchell Marsh, the Australian captain, faced a dramatic lbw dismissal by Lungi Ngidi. Lungi Ngidi delivered a sharp in-swinging delivery, striking Marsh on the front pad. A confident appeal followed, and although Marsh reviewed the decision, it stood, resulting in his departure for 6 runs from 9 balls. This wicket was a significant blow to Australia.
Marnus Labuschagne’s Caught Behind
Marnus Labuschagne’s innings came to an end when he was caught behind by Quinton de Kock off Marco Jansen’s delivery. Labuschagne tried to flick a short ball but ended up edging it behind to the wicketkeeper. His departure added to the pressure on the Australian batting lineup.
Alex Carey’s Dramatic 99

Alex Carey played a sensational innings, scoring 99 runs from 77 balls, including 9 boundaries and 4 sixes. However, his quest for a century was heartbreakingly cut short when he was caught by Quinton de Kock off Kagiso Rabada’s short ball. Falling just one run short of his century, Carey’s departure added to the drama of the match.
Marcus Stoinis’ Caught Behind
Marcus Stoinis fell victim to Kagiso Rabada’s short delivery, which took an extra bounce. Stoinis attempted a pull shot but ended up getting a top edge. Quinton de Kock completed a comfortable catch behind the stumps, and Stoinis departed for 18 runs from 13 balls.
Tim David’s Night Sky Drama
Tim David’s aggressive intent was evident in his innings, where he scored 35 runs from 25 balls, including 2 boundaries and 3 sixes. However, his aggressive approach led to his dismissal as he heaved a slower ball from Lungi Ngidi high into the night sky. Aiden Markram took a fantastic catch to dismiss the dangerous Tim David.
Michael Neser’s Middle Stump Knocked Over
Michael Neser’s brief stay at the crease ended when Keshav Maharaj bowled a short ball just over the leg stump. Neser attempted to cut the ball but got an inside edge, sending the ball crashing into the middle stump. This wicket further consolidated South Africa’s position.
Nathan Ellis’ Stunning Catch
Nathan Ellis was dismissed when he attempted to tuck a slower delivery from Lungi Ngidi on the leg side. He ended up chipping the ball in the air towards mid-wicket, where Kagiso Rabada initially overran but then turned back to take a remarkable one-handed catch. This catch showcased the fielding prowess of South Africa.
Adam Zampa’s Caught-Behind Drama
Adam Zampa’s innings came to an end when he edged Kagiso Rabada’s delivery to the wicketkeeper Quinton de Kock. The catch was initially turned down, but South Africa successfully reviewed the decision, and the UltraEdge confirmed the faint edge. Zampa’s departure left Australia with just two wickets remaining.
Josh Hazlewood’s Unbeaten Stand
Josh Hazlewood, coming in towards the end of the innings, remained unbeaten, offering hope to Australia’s tailenders. His contribution with the bat will be crucial in the final push for runs.
South Africa’s Bowling Highlights

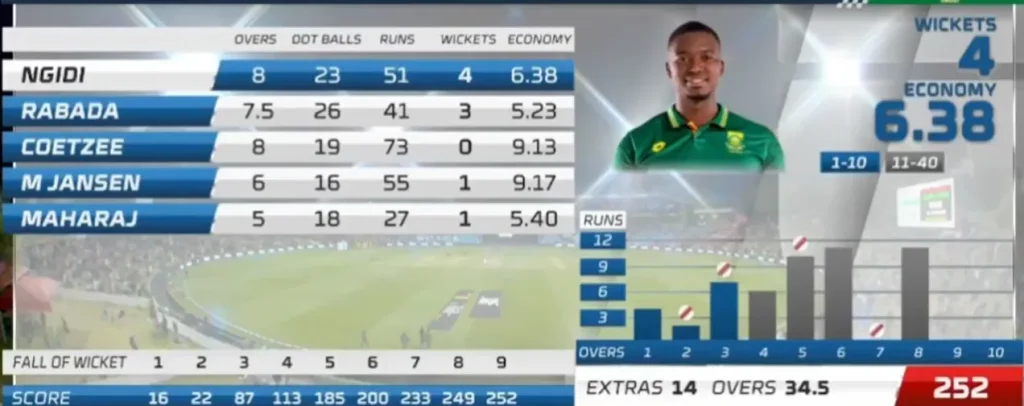
outh Africa’s formidable bowling attack successfully defended their imposing target of 416 runs by dismantling the entire Australian batting lineup. Lungi Ngidi led the charge with a rampant four-wicket haul, combining raw pace with precision to rattle the Aussies. Kagiso Rabada provided invaluable support with his three-pronged attack, meticulously removing key Australian batsmen.
Gerald Coetzee’s tenacious effort and Marco Jansen’s vital breakthrough added to the stranglehold on Australia’s innings. Keshav Maharaj’s spin artistry was the icing on the cake, contributing to the swift dismissal of the opposition. Together, they orchestrated a comprehensive dismantling of Australia’s batting order, underscoring South Africa’s dominance in defending the monumental target.
Lungi Ngidi’s Rampant Four-Wicket Haul
Lungi Ngidi’s ferocious pace and pinpoint accuracy wreaked havoc on the Australian batting order. With a superb spell of 8 overs, he claimed four critical wickets while conceding just 51 runs. His relentless assault, including the lbw dismissal of Mitchell Marsh and the pivotal catch at covers to send David Warner packing, showcased his ability to dismantle the opposition. Ngidi’s economy rate of 6.38 was icing on the cake, keeping the pressure firmly on Australia.
Kagiso Rabada’s Three-Pronged Attack
Kagiso Rabada, the spearhead of South Africa’s bowling attack, was in prime form. He scalped three crucial wickets in his 7.5 overs, conceding only 41 runs. Rabada’s mastery was evident in his ability to dismiss Marcus Stoinis, end Alex Carey’s valiant innings just one run short of a century, and send Michael Neser back to the pavilion. His economy rate of 5.23 further underlined his dominance, making him a formidable force against the Australian batsmen.
Gerald Coetzee’s Tenacity
Gerald Coetzee may not have taken wickets in this innings, but his tenacity shone through. Bowling 8 overs, he conceded 73 runs but kept a tight leash on the run rate. His unyielding effort, despite the absence of wickets, contributed to the overall pressure South Africa exerted on the Australian side.
Marco Jansen’s Vital Breakthrough
Marco Jansen’s contribution may have flown slightly under the radar, but his breakthrough wicket was crucial. Bowling 6 overs, he conceded 55 runs but managed to dismiss a key Australian batsman. Jansen’s ability to make inroads when needed demonstrated his value as a supporting bowler.
Keshav Maharaj’s Swift Impact
Keshav Maharaj made a swift impact with the ball, making the most of his limited opportunities. In his 5-over spell, he snared a wicket by dismissing Michael Neser for just 3 runs. Maharaj’s effectiveness in breaking through the Australian middle order, coupled with an economy rate of 5.40, showcased his spin prowess and its significance in the South African bowling arsenal.
