
AUS vs SA: Australia secured a commanding victory against South Africa in the T20I clash at Kingsmead. A blazing batting performance, led by Mitchell Marsh’s unbeaten 92*, propelled them to a daunting total of 226/6. Backed by formidable bowling, spearheaded by Tanveer Sangha, they dismantled South Africa for just 115 runs, highlighting Australia’s all-round dominance.
Match Preview: AUS vs SA 1st T20 Highlights 2023
An enthralling three-match T20I series had been set in motion between cricket giants South Africa and Australia. The series opener took place at the iconic Kingsmead in Durban. Amid the imminent ODI World Cup, this T20I showdown held remarkable significance as both teams sought to fine-tune their strategies and assess their strengths ahead of the impending pinnacle event.
For more details, please visit espncricinfo.Playing XIs:
South Africa
- Aiden Markram (c)
- Temba Bavuma
- Reeza Hendricks
- Rassie van der Dussen
- Dewald Brevis
- Tristan Stubbs (wk)
- Marco Jansen
- Keshav Maharaj
- Lungi Ngidi
- Tabraiz Shamsi
- Sisanda Magala
Australia:
- Travis Head
- Matthew Short
- Mitchell Marsh (c)
- Marcus Stoinis
- Tim David
- Aaron Hardie
- Josh Inglis (wk)
- Adam Zampa
- Nathan Ellis
- Sean Abbott
- Spencer Johnson
Pitch Conditions: Kingsmead in Durban had presented an enticing pitch for the T20 encounter. Traditionally, the pitch offered a blend of bounce and pace, a testament to its reputation as a challenging track for both batsmen and bowlers. The surface lent early assistance to seamers, with spinners gradually coming into prominence as the match progressed. The variable conditions necessitated adaptable strategies from both teams.
- South Africa had grappled with the absence of key regulars, thereby granting newer talents like Dewald Brevis the opportunity to make their mark on the international stage.
- Australia had missed the services of some prominent players, providing a platform for the young guns to seize their moment and secure their positions in the team.
- Aiden Markram had led South Africa, proving pivotal with his leadership and his dual proficiency in batting and bowling on home soil.
- Mitchell Marsh had captained Australia, assuming the mantle of a key all-rounder for his team, contributing significantly with both the bat and ball.
- The series had promised a captivating contest between seasoned veterans and emerging talents, encapsulating the essence of cricket for fervent fans.
- The passionate home crowd had served as a potential catalyst, elevating South Africa’s morale and overall performance on the field.
With both sides vying for an initial advantage in the series, the match at Kingsmead delivered pulsating T20 action. Observers had closely monitored standout performances and strategic maneuvers as both teams aspired to secure victory in this engaging clash.
AUS vs SA: 1st T20I Highlights
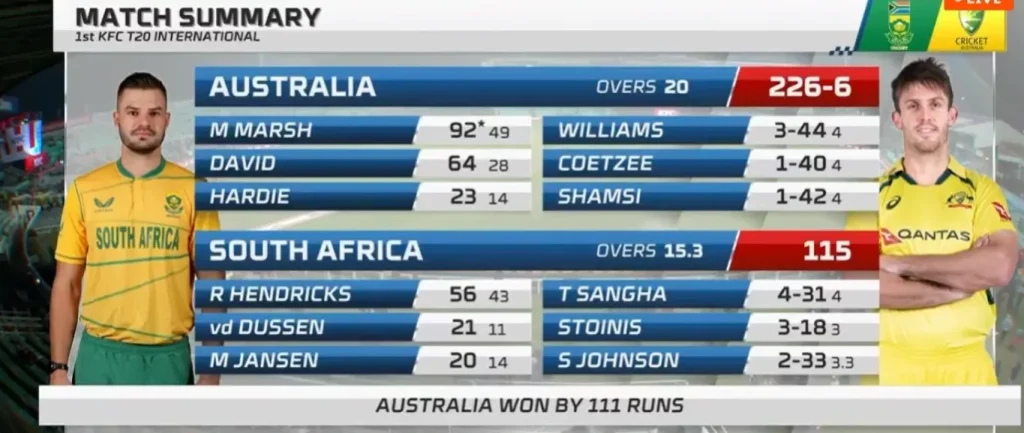
1st Innings: AUS vs SA, 1st T20I 2023
Australia’s T20I clash with South Africa at Kingsmead witnessed a blazing start despite Travis Head’s early exit post a six in the first over. Underpinned by Mitchell Marsh’s explosive 41 off 15 balls, including 3 fours and 3 sixes, Australia notched 70 runs for 3 wickets during the Powerplay. Matt Short’s brisk 20 off 11 balls and a pivotal 97-run partnership between Tim David and Marsh sustained the momentum. Their controlled aggression yielded a run rate of 11.0, steering Australia to 167/4 by the 15th over.
The final overs witnessed a flourish, elevating Australia’s total to a daunting 226/6. Mitchell Marsh’s masterclass remained the centerpiece, his unbeaten 92* off 49 balls forming the backbone of the innings. Aaron Hardie’s impactful debut cameo of 23 off 14 balls further bolstered the total. The innings was punctuated by key moments, including Marsh capitalizing on dropped catches and strategic boundary-hitting. Ultimately, Australia’s fierce batting display, epitomized by Marsh’s authoritative innings and Hardie’s calculated aggression, positioned them as the dominant force heading into the break, leaving South Africa with a monumental challenge ahead.
Australia’s Batting Highlights
Mitchell Marsh led the Australian charge with a sensational batting display, amassing an unbeaten 92 runs off just 49 balls. His aggressive approach yielded 6 fours and 4 sixes, anchoring the innings during crucial stages. Marsh’s dominance was evident as he reached his half-century in just 22 deliveries, showcasing his ability to find gaps and accelerate the scoring.
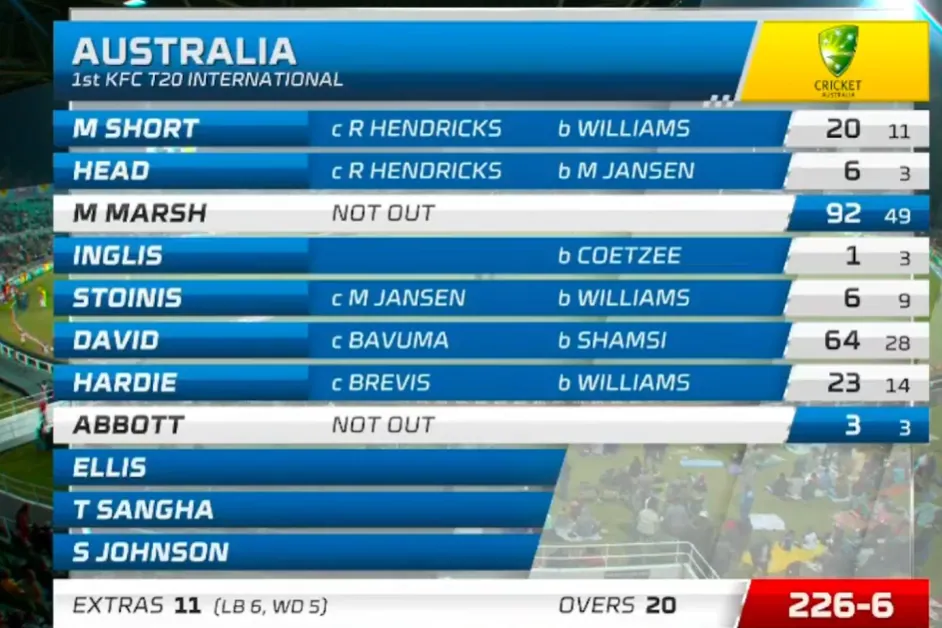
Tim David provided a strong partner, registering a well-deserved half-century of his own, with 50 runs off 24 balls, comprising 5 boundaries and 2 sixes. The duo’s partnership was the backbone of Australia’s middle-order surge, effectively capitalizing on loose deliveries and maintaining a remarkable run rate of 11.3.
South Africa’s Bowling Highlights
Gerald Coetzee emerged as a potent force in South Africa’s bowling attack, making significant breakthroughs during the powerplay. His skillful variations led to the dismissals of key Australian batsmen, including a brilliant delivery that shattered the stumps of Josh Inglis. Lungi Ngidi showcased his talent with a mix of deliveries, creating moments of uncertainty for the batsmen.
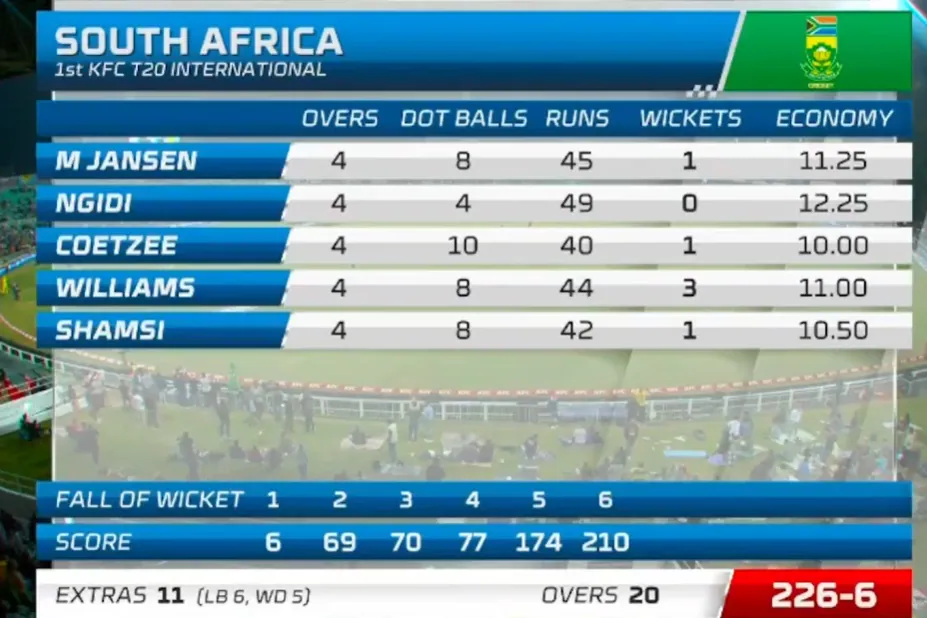
Marco Jansen’s efforts were marked by a mix of lengths and lines, with occasional challenges posed by his deliveries. Despite some challenges in containing the aggressive Australian batting, South Africa’s bowlers managed to maintain their composure and claim crucial wickets, ultimately contributing to restricting Australia to a competitive total of 226/6.
Explosive Powerplay: Marsh’s Aggression and Coetzee’s Impact Define the Action
During the first six overs, Australia scored 70 runs for 3 wickets, with a notable run rate of 11.7. Mitchell Marsh stood out, amassing 41 runs off 15 balls, including 3 fours and 3 sixes, driving their aggressive batting display. Despite challenges faced by South African bowlers, they made crucial breakthroughs, including Gerald Coetzee’s dismissal of Josh Inglis, and kept Australia on their toes. The stage was set for an intense contest.
The Australian openers laid a solid foundation, led by Matt Short’s 20 runs from 11 balls, yet lost wickets, including Travis Head’s swift 6 runs. Coetzee’s impactful over in the powerplay accounted for dismissals and added uncertainty. South Africa aimed to seize momentum through containment and wicket-taking, while Australia sought to capitalize on their strong start as the game progressed.
Fierce Partnership Ignites Australia’s Middle Over Surge
During the middle overs, Australia’s innings displayed a mix of controlled aggression and calculated shot selection. Mitchell Marsh and Tim David formed a pivotal partnership, propelling the team’s score with rapid half-centuries. Marsh’s fifty off 22 balls showcased his attacking approach, while David’s fifty in 24 balls highlighted his power and placement skills. They consistently found boundaries and rotated the strike, maintaining a run rate around 11.0.
The duo’s partnership showcased their ability to tackle varied bowling styles, with highlights including David’s powerful hits over the boundary and Marsh’s effective strike rotation. These middle overs formed the backbone of Australia’s innings, with the batsmen’s combination of aggression and careful planning resulting in a steady accumulation of runs and a score of 167/4 by the 15th over.
Marsh’s Mastery and Hardie’s Aggression Propel Australia to 226/6 in Final Flourish
Australia concluded their innings with a total of 226/6 after the final five overs yielded 60 runs. Mitchell Marsh played a pivotal role, remaining unbeaten with a commanding 92* off 49 balls. Lungi Ngidi’s 19th over saw Marsh capitalize on a dropped catch for a boundary, while Aaron Hardie also contributed with a couple of boundaries.
Lizaad Williams’ 18th over witnessed Marsh’s aggressive strokeplay, accumulating boundaries to reach the 200-run milestone. The 16th over, bowled by Williams, showcased Hardie’s calculated aggression, featuring a six and a boundary. Despite the loss of a wicket, Marsh and Hardie’s timely strikes maintained Australia’s momentum, closing the innings with a notable run rate of 11.3.
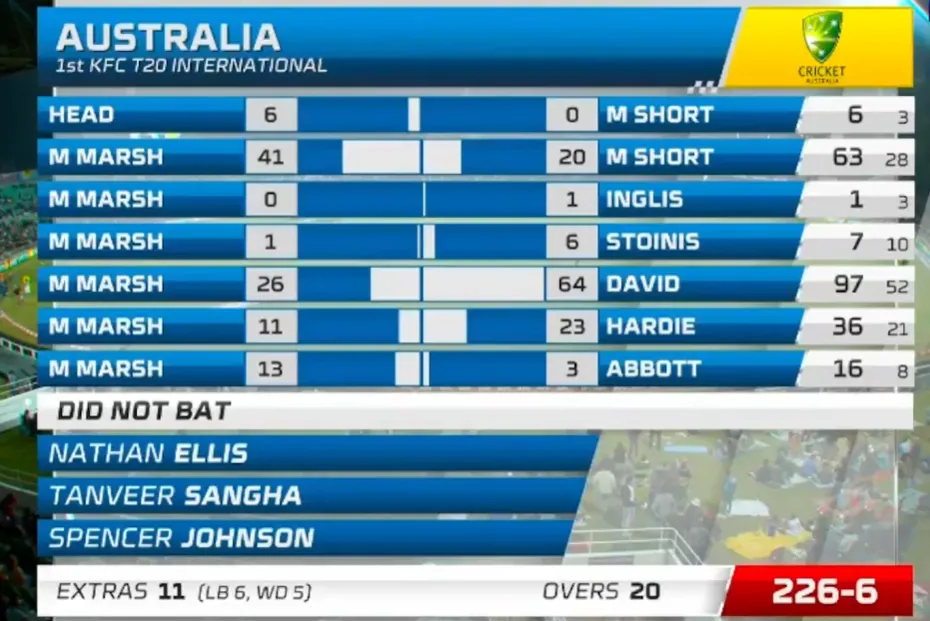
In the final phase, Marsh’s authoritative batting stood out, and his partnership with Hardie provided the necessary acceleration. Marsh’s unbeaten 92* and Hardie’s calculated aggression propelled Australia to a competitive total, highlighting their intent to challenge the opposition.
2nd Innings: AUS vs SA, 1st T20I 2023
South Africa stormed into the match with an explosive powerplay, reaching 53/2 in 6 overs, led by Reeza Hendricks’ aggressive 28 off 19 balls. However, despite Hendricks and Marco Jansen’s efforts, South Africa managed only 96/5 in 12 overs against Australia’s persistent bowling, with Tanveer Sangha’s key wickets making a dent.
Australia’s dominant bowling dismantled South Africa, limiting them to 115 all out. Reeza Hendricks fought valiantly with 56 runs, but Australia’s attack, spearheaded by Spencer Johnson and Tanveer Sangha, proved too much. This resounding victory showcased Australia’s bowling prowess and a strong start in the T20I series.
South Africa’s Batting Highlights
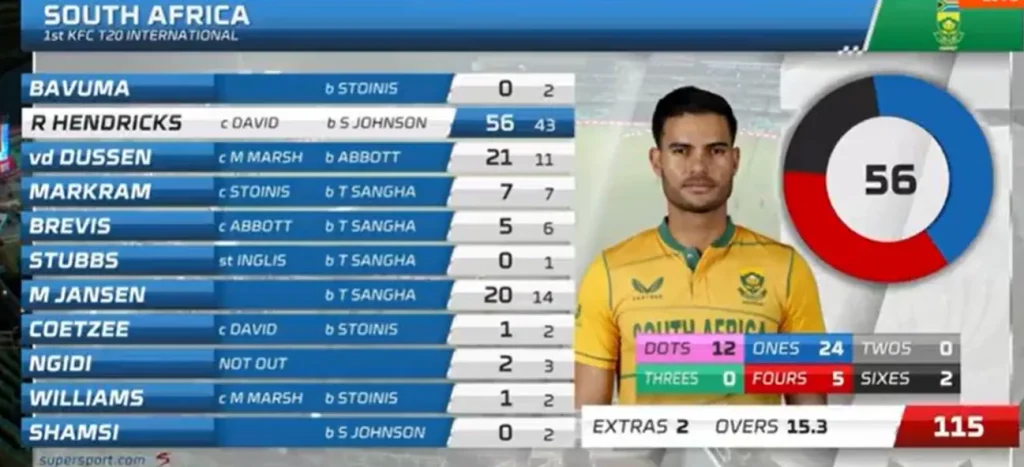
- Explosive Start: South Africa kicks off the match with a blistering powerplay, scoring 53/2 in 6 overs.
- Reeza Hendricks Shines: Hendricks’ aggressive batting steals the show, amassing 28 runs off 19 balls, including a boundary and an impressive six.
- Hendricks’ Heroics: Despite the collapse, Hendricks holds the innings together with a solid knock of 56 runs, showcasing his determination.
- Australia’s Pressure: South Africa struggles against Australia’s disciplined bowling attack, failing to build substantial partnerships.
Australia’s Bowling Highlights
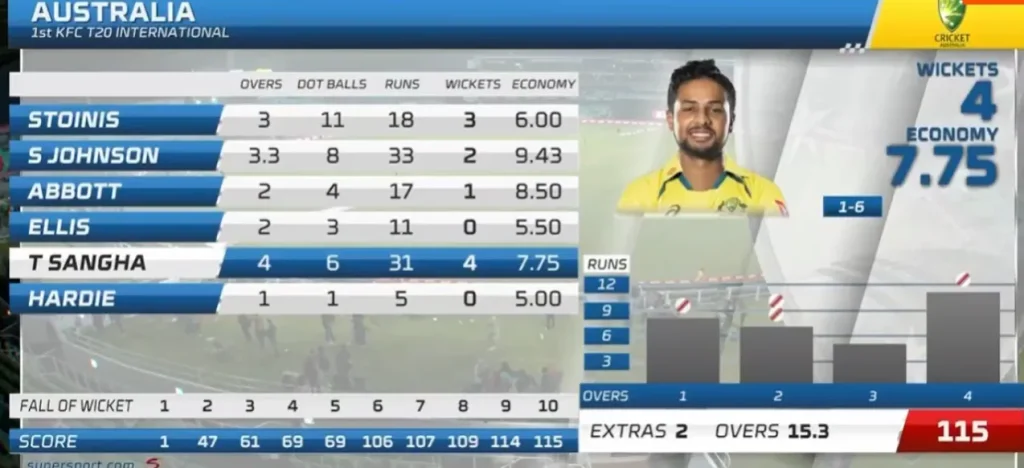
- Australia’s Dominance: Australia’s bowlers put up a formidable display, restricting South Africa to a total of 115 all out.
- Key Wickets: Sean Abbott’s crucial delivery dismisses Rassie van der Dussen, while Tanveer Sangha’s effective bowling disrupts South Africa’s momentum.
- Johnson and Stoinis Shine: Spencer Johnson and Marcus Stoinis prove pivotal, taking crucial wickets at key junctures.
- Sangha’s Brilliance: Tanveer Sangha’s four-wicket haul underscores his bowling prowess, sealing Australia’s resounding victory.
- Comprehensive Win: Australia’s disciplined bowling and consistent pressure ensure a comprehensive victory, emphasizing their dominance in the ODI series opener.
Explosive Start: South Africa Sets Pace with 53/2 in Powerplay Blitz
During the initial six overs of the match, South Africa achieved a score of 53/2, maintaining a run rate of 8.83. Reeza Hendricks emerged as the standout performer, amassing 28 runs off 19 deliveries, including a boundary and a six. Aiden Markram chipped in with 4 runs off 4 balls, setting a steady foundation.
Notably, Sean Abbott’s delivery accounted for a pivotal wicket – Rassie van der Dussen departed for 21 runs, caught by Mitchell Marsh off a leg-cutter. Hendricks seized the opportunity, scoring 17 runs in the fourth over with a well-placed boundary and an impressive six. This flurry of aggressive batting momentarily put South Africa in control. Marcus Stoinis made an early impact by dismissing Temba Bavuma for a duck, adding to the powerplay’s intensity.
South Africa Gathers 96/5 in 12 Overs Amidst Opposition Pressure
In the next six overs, South Africa stands at 96/5 after 12 overs, maintaining a current run rate of 8.00, while requiring 16.4 runs per over. Nathan Ellis’ 2-over spell for the opposition saw 11 runs conceded. In the 10th over, Reeza Hendricks and Marco Jansen led South Africa’s charge, accumulating 12 runs, with Hendricks contributing 10 of those runs. However, Tanveer Sangha’s effective bowling in the 9th over disrupted South Africa’s momentum, securing two crucial wickets.
Despite Sangha’s impact, the 8th over witnessed a resilient South African performance, adding 6 runs to their total. Hendricks’ boundary highlighted the over, although Dewald Brevis fell to Sean Abbott’s delivery. As the game progresses, Reeza Hendricks and Marco Jansen remain pivotal in South Africa’s pursuit of a competitive score against the opposition’s bowling prowess.
Dominant Bowling Display Leads Australia to Resounding Victory in 1st ODI Against South Africa
South Africa’s innings faltered, culminating in their total of 115 all out. The match concluded dramatically in the 16th over as Spencer Johnson bowled a pivotal delivery to dismiss Tabraiz Shamsi, whose stumps were rattled after failing to get his bat down in time.
Earlier, Reeza Hendricks was the standout performer for South Africa with a solid knock of 56 runs off 43 deliveries. However, his efforts were insufficient to counter the Australian attack. Johnson and Marcus Stoinis were the key figures in Australia’s bowling lineup, claiming crucial wickets at key junctures.
Lizaad Williams and Gerald Coetzee fell in quick succession, with Stoinis taking both wickets. Tanveer Sangha was another star in Australia’s bowling arsenal, grabbing four important wickets, including that of Marco Jansen, who was bowled trying to sweep.
Reeza Hendricks reached a well-deserved half-century with some impressive shots. Nonetheless, his efforts couldn’t prevent South Africa from slipping to 107/6. The chase proved to be a challenging one, with Australia’s bowlers consistently putting pressure on the South African batsmen.
In the end, it was Australia’s disciplined bowling performance and the inability of South Africa’s middle and lower order to build substantial partnerships that proved decisive. This comprehensive victory showcased Australia’s dominance and provided them with a winning start in the ODI series against South Africa.
